Choosing the wrong ice cream cup can hurt your brand and profits. Inconsistent portions and high storage costs are stressful. This guide helps you pick the perfect packaging for your business.
You need to know standard sizes (3-32 oz) for portion control, how custom printing builds your brand, the right way to store cups to prevent waste, and smart distribution to save money.

I've worked with hundreds of ice cream businesses, from small local shops to large chains. The first conversation we always have is about size. It’s the foundation of your entire operation, affecting everything from how much a customer pays to how many boxes you can fit in your storeroom. Getting this right from the start saves so much trouble later. So, let’s begin with the basics: the standard sizes you’ll find in the industry.
Which Standard Ice Cream Cup Size is Right for You?
Unsure which cup size to order for single scoops or sundaes? This confusion leads to inconsistent portions, unhappy customers, and wasted inventory. Let's match each size to its perfect use.
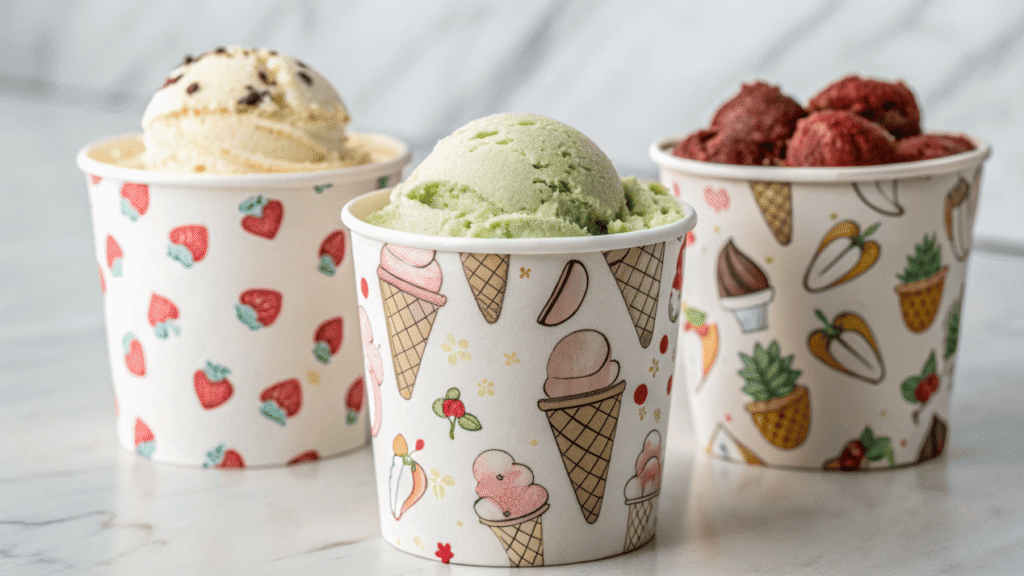
Use 3-4 oz cups for samples, 5-6 oz for a generous single scoop, 8-10 oz for sundaes, and 16 oz for take-home pints. Matching the size to the serving controls costs.

I always advise my clients to think of sizes not in ounces, but in purpose. Each size has a job to do for your business. Choosing the wrong size can make your portions look too small or cause you to give away too much product, cutting into your profit margins on every sale. It is the first and most important step in managing your costs. For my clients, I break it down into very practical terms so they can build their menu with confidence. A clear sizing strategy makes training staff easy and ensures every customer gets the same great experience. Let's look at the most common sizes and how successful businesses use them.
| Size (oz / mL) | Common Use | My Pro Tip |
|---|---|---|
| 3–4 oz / 89–118 mL | Samples, Kids' Portions | The 4 oz is the industry standard for a "single scoop." It's perfect for managing costs. |
| 5–6 oz / 148–177 mL | Generous Single Scoop, Small Sundae | This size feels like a good value to customers for a standard serving with one or two toppings. |
| 8–10 oz / 237–296 mL | Double Scoops, Regular Sundaes | This is your workhorse for medium-sized menu items. It's big enough for multiple toppings. |
| 12–16 oz / 355–473 mL | Large Servings, Take-Home Pints | The 16 oz is essential. It is the universal size for pre-packaged pints for customers to enjoy at home. |
| 20–32 oz / 591–946 mL | Family Size, Bulk To-Go | Use these for shareable desserts or large take-home orders. They position you as a go-to for parties. |
How Can Custom Cups Grow Your Brand?
Your plain white cups get lost in the crowd. This makes your brand forgettable and hurts customer loyalty. Custom printing transforms your cup into a powerful marketing tool that stands out.
Custom cups act as mini-billboards. Your logo and colors on every cup build brand recognition with every sale, making your business look professional and memorable, which encourages repeat customers.

A cup isn't just a container; it's a conversation with your customer. A plain cup says nothing. A custom-printed cup tells your story. This is one of the most cost-effective marketing investments you can make. Every customer who walks out your door becomes a walking advertisement. I've seen new shops gain recognition incredibly fast just by having a beautiful, unique cup design. It makes your product look more premium and justifies your pricing.
Key Things to Know
When we start a custom project, clients often ask about the process. Here's what you need to prepare for:
- Minimum Order Quantities (MOQ): Custom printing has setup costs, so factories require a minimum order. This can be anywhere from 50,000 to 100,000 pieces for large-scale, high-quality printing. Smaller runs are sometimes possible but the cost per cup is much higher.
- Design Files: You will need your logo or design in a high-resolution vector format. These are usually PDF, AI, or EPS files. This ensures the print is sharp and not blurry. We can always help clients finalize their designs.
- Proofing: Before we produce 50,000 cups, we will provide you with a digital mockup. This is a 2D or 3D image showing exactly how your design will look on the cup. You must approve this proof before we start mass production.
Are You Storing Your Ice Cream Cups Correctly?
You open a box of cups only to find them crushed, dusty, or misshapen. This is wasted money and a potential hygiene risk. Proper storage is simple and protects your investment.
Store cups in their original sealed packaging in a cool, dry place away from sunlight. Keep them off the floor and don't stack boxes too high to prevent crushing and contamination.

This topic might seem boring, but I have seen clients lose thousands of dollars from poor storage. You paid for those cups; they are part of your inventory and an asset to your business. Protecting them is just as important as protecting your other ingredients. Contaminated or damaged cups are unusable and go straight into the trash. It's a completely avoidable expense.
My Simple Rules for Storage
Follow these guidelines to keep your cup inventory safe and clean:
- The Right Environment: Your storeroom should be cool and dry. High humidity is the enemy of paper cups; it can make the paper soft and cause the cups to lose their shape or even stick together. Keep the temperature between 5°C and 25°C.
- Keep Them Packaged: Do not take cups out of their original packaging until you are ready to use them. The cardboard boxes and plastic sleeves are designed to protect them from dust, moisture, and pests.
- Stack Smartly: Never place heavy objects on top of your cup boxes. I recommend storing them on pallets or shelves, never directly on the floor, which can attract moisture. Don't stack the boxes too high, as the weight from the top boxes can crush the ones at the bottom.
- Avoid Sunlight: Keep the boxes away from windows. Direct sunlight can cause the printed colors on your custom cups to fade over time.
How Can You Make Distribution More Efficient?
High shipping costs are eating into your profits. You're paying to ship empty air in poorly packed boxes. Smart packaging and pallet strategies can drastically cut your distribution expenses.
Use packaging that fits your cups securely to minimize empty space. Standardize box sizes for easy stacking and pack pallets tightly to maximize density, which lowers your cost per unit shipped.

As a manufacturer, I think about logistics every day. Getting products safely and cheaply from my factory to your shop is a huge part of my job. Many clients, especially those with multiple locations or a distribution business, are shocked by shipping costs. The key is to ship as little "air" as possible. Shipping companies often charge by "dimensional weight," which means they charge you for the space a box takes up, not just its actual weight. Big, half-empty boxes are very expensive to ship.
First, we design packaging to securely hold the cups with minimal wasted space. This increases the number of cups per box. Second, we use standardized box sizes that stack perfectly onto a standard pallet (like a 48" x 40" pallet). I often tell my team it's like playing Tetris. We stack boxes in a stable, interlocking pattern to fit as many as possible onto one pallet. This maximizes space in the shipping container or truck. By increasing the density, we lower the shipping cost for each individual cup, a saving that I can then pass on to my clients. This level of planning is essential for anyone operating at scale.
Conclusion
Choosing the right cups and handling them smartly isn't just about packaging. It's about building a stronger, more profitable brand from the ground up, with an expert partner's help.